December 31, 2009

Anatomy of a veggie Christmas


I've been vegetarian for a little over a year now. This is my second veggie Christmas. Last year I was visiting my folks in Tasmania and we all went to a Turkish restaurant for lunch. It was lovely, but not a silly-hat-and-crackers kind of affair. Which is usually how we roll. This year, the folks came up to Canberra.

So I said, no sweat, we'll have lunch at home. You guys can cook the traditional roast chicken and I'll supply a veg dish. Hell, two veg dishes. And I'll even make them vegan so that Dad, who's lactose-intolerant, can try them.

And so it was that Christmas Eve rolled around and I realised that if a roast was cooking I'd be hard pressed to have my two main courses ready at the same time. So I'd have to pre-cook them. No worries, I thought. I'll get right on to it. I planned out my two dishes - lentil bobotie (from Linda Stoner's book "Now Vegan!") & veg lasagna (based on the mediterranean lasagne from Delia's vegetarian collection using vegan cheese sauce and vegan white sauce).

So I got right onto... sewing a zebra bag. 6pm rolls around. No sweat, I think. I still have time. I search for vegan lasagna recipes online. I dig out my recipe book for the lasagna I made last time. The first line reads "Prepare the aubergine and courgettes ahead of time". Oh...

I get the zucchini and eggplant sweating, cube up the rest of the veg and put them in a roasting tray. When they're all in the oven I turn my attention to the bobotie. The bobotie is ready to go in when the roast veg come out. I'm on a roll! Next I tackle the cheese sauce and the white sauce.

The kitchen timer goes off as I'm stirring the white sauce. I find myself in a bit of a pickle. I need to take the bobotie out but I can't stop stirring the white sauce or it'll go lumpy and/or burn to the bottom.

I compromise, and turn off the oven with one hand, and open the door slightly so it can cool. So there I was, sweating away as I stirred the white sauce, now with the oven air streaming up to heat my already-sweating face. Plus I burned my finger when my curiosity as to what vegan white sauce tastes like got the better of me.

At this point, I pause and wonder just why I'm bringing two such un-Christmassy and unrelated dishes... I decorate the bobotie with cherry tomatoes and basil leaves in the form of holly in an attempt to cheer myself up.

As the lasagna baked, I set to work making yummy orange and date cookies (from Nicola Graime's book "Vegan cooking"). I have made these so many times... they're easy to make and delicious to boot! As the lasagna came out of the oven, the cookies went in.

In the end, everything went down well with different members of my family and there were plenty of leftovers.

Merry Christmas and a happy new year to you all!

To finish off, here's a shot of the lovely dish & choccies that Mum - whoops, I mean Santa - left me. Mmmmmm!

December 24, 2009

A zebra and some boats


At a crafty session a friend's house recently, I was sorting through her fabric basket when I came across this fabric. She had been screenpainting onto it before moving on to t-shirts.

What was I planning to do with it? Why make a Morsbag of course!


I love the colours, the print and the fabric. I'm planning to gift it back to her soon.


It folds down neatly into a little bundle which can be stashed in a bag or vehicle for easy access when you need it.


I've also started experimenting with different types of handles - the blue and white handles pictured were for my sister's boyfriend's Christmas Morsbag. It was a stripy pillowcase in its previous life. I didn't crack out the iron once for his bag, which was satisfying!


Related posts: Morsbags, Recycling old pillowcases into Morsbags

December 23, 2009

Vegan truffles


I made these truffles following Dreena's recipe. The only reasonably-priced vegan dark chocolate I could find at Coles (after all, I needed to get 3 x 100g blocks) was 70% cocoa. I'm not much of a dark chocolate girl - I prefer around the 50-60% mark personally.

Still, they're part of a Christmas gift for my housemate, who is vegan, so that's what I went for. Also, I stuck with almond essence rather than almond extract (again, based on availability). For the liqueur, I used Cointreau. Mmm.


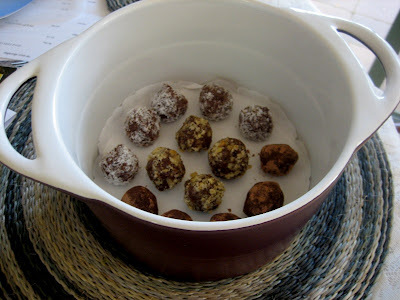
Her main present is a darling purple & white round casserole dish with a matching lid which I picked up from my local Op-Shop. My family and friends follow the tradition whereby you put a coin in a wallet when it is a gift, so I decided to extend that, and place some food in the baking dish. (The fact that living with her gives me immediate access to copious quantities of truffles post-Christmas may also have contributed to this decision...)

I just traced the bottom of the casserole onto freezer paper (of which I have a roll of for stencilling) and then layered the truffles up with freezer paper between each layer.


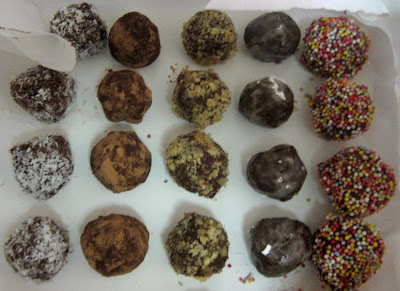
From left to right: Coconut, cocoa, crushed walnuts, icing sugar and hundreds&thousands.

December 21, 2009

Christmas Dotees

Merry Christmas everyone!

I hope you all enjoy it, however you choose to celebrate this occasion.


Who could that handsome fellow be?


The countdown to Christmas has transformed crafting from a relaxing pastime to a frantic race against the clock for me. This is compounded by sending to people in other states and having to rely on the postal system.... a postal system that is experiencing strikes at the moment.

Having little choice, I bought an overnight satchel. So there I was at 5:55pm (the deadline is 6pm), trying to stuff my satchel in the special yellow post bin, unable to get it in. A man sitting on a bench nearby watched on with wry amusement. He mentioned that there were a few workers still in the office. I pleaded with them through the glass, but they shook their head and ignored me. Seeing me re-emerge with the parcel, the man from the bench helped me somehow squeeze the parcel through the slot. I love helpful strangers!

Back to the dotees...


Santa's body is about 6.5cm (~2.75") and the angel's is about 8cm (~3.25"). It took a long time to settle on the Angel's body colour, and her wings were quite labour intensive. The charms are from last year's post-Christmas sales.

I always like to compare my final creations to their sketch-form. Let's take a peek...


  • Santa's head got much larger, so the gloves had to go. Otherwise, he's pretty similar!
  • The angel was originally going to have gold ringlets (see my previous itty bitty dotee to see what that looks like), but I went for a different look in the end. The blue body and black hair contrast more in real life. I probably should have stuck with stitching the star design on her body, but I'm having a bit of a love affair with felt!
Just for laughs, I left in little bits of other sketches of dotees... these were done by a friend who decided I was doing too many cutesy designs and should include some gore in the next batch. There's also the bottom of a snowman dotee which didn't end up being made... maybe next year!

To finish off, I'd like to take this chance to thank whoever invented the purple disappearing ink pens... it has made stitching faces so much easier!

December 16, 2009

The Cunning Cupcake Caper


I've had a lot going on this last month, including (but not limited to) impending deadlines for my honours-thesis-of-doom. Luckily, I have two sisters who are intent on cheering me up, no matter how many colourful cupcakes and edible glittery gel such a feat might require.


The sheer quantity of cupcakes allowed for plenty of sharing amongst friends. These were by far the most popular ones: a double-choc base, with a chocolate mousse filling and cream on top. Comfort food, anybody?

November 13, 2009

Morsbags from tea towels


It's my mum's birthday on Monday, so I decided to include a Morsbag in her gift.

This tea towel has lovely Australian Aboriginal designs printed onto linen. You can see them all when it is unfolded:


It has longer and thinner handle than the traditional Morsbag. The following one was also made from a tea towel salvaged from an op-shop:


I hope everyone's having a great November, things should calm down for me when exam period finishes. I have lots of plans for summer!


Related posts: Morsbags, Recycling old pillowcases into Morsbags

November 12, 2009

The dreadlocks are finished


Here they are, a few days and a wash after I finished them. They seem to be doing well. They're a bit fluffy, but it's early days yet! I'm waiting to see if they mat further by themselves soon, otherwise I'll get the crochet hook out again...


Related post: Crafting with... hair?

November 7, 2009

Eugene wants a hug!

I finished Eugene last night, so he'll be off to join the everyone else's toys for the Softies for Mirabel drive soon :)

He turned out pretty well, though I had trouble with a few things. I struggled with the face stitching and ended up using small black felt circles for the eyes. I was incapable of sewing the horns on straight, and it took me ages to do the last step where you tuck in the bottom and sew on the legs... but it was worth it!


Related post: Udderly lovely cow for Mirabel

November 6, 2009

My local op-shop and recycling resources in Australia

I have become a bit of a recycling nut of late. I love sifting through the clothes racks, finding something I like, and getting that little thrill when I realise it's in my size.

My favourite op-shop in Canberra in Y's Buys in Kingston. I swear I'm in there several times a week. It's really small and has a high turnover. Also, it's cheap - the clothes are at least half as expensive as the ones that you find, say, at the Salvos in Fyshwick. They know me by sight, as I'm always sifting through the fabric bucket, sewing supplies, teatowels and pillowcases. I also go there to donate Morsbags. I love that they keep so many crafty things... today I picked up a big bag of polyster polyfill, a large wooden hoop for screen-painting, and a bunch of elastic, sewing machine bobbins and safety pins... all for $2!

Here's some of my recent loot...


Random lace, antique ribbon, old buttons... I'm in heaven... I'm always eyeing off their hugs assortment of knitting needles too, but I can easily restrain myself as I don't know how to knit yet!


I also thought the cross-stitched pots on the - what is that? A centerpiece for a table? - are cute. And so much of my summer wardrobe has come from that op-shop. Today I scored the cute singlet top pictured.

On the subject of recycling, Planet Ark runs a fabulous website on how to recycle and/or dispose of things correctly: Recycling Near you. It's got info for every state in Australia, and answers common questions like...
  • whether you can recycle drinking glasses
  • how to properly dispose of cooking oils
  • where old clothes can be dropped off to be made into rags
  • whether you need to wash jars before recycling them
  • when events such as kerbside collection and "Big Aussie Swap" parties are taking place
... and much much more! Definitely worth a look.


Related post: Morsbags

November 5, 2009

Udderly lovely cow for Mirabel

I'm sure many of you have heard of Pip's annual Softies for Mirabel drive. If you haven't, head over and read about it. It's a worthwhile cause and a good excuse to make a softie!

I completed my fourth-last piece of assessment for the semester today (optimistically worded!), a study of the morals and ethics in a short story by Isabel Allende. Since the essay's in Spanish, I read over it again and again, knowing that no matter how hard I try, there are always mistakes... very frustrating! At least when you're sewing, you can see the mistakes and unpick them... anyway, to cheer myself up I chose a softie to make, settling on Fliss Dodd's pattern: The Udderly lovely cow from Pip's Meet me at Mike's book.


It's been high on my "to do" list for some time, but I could never decide which fabric to use.

I took the plunge and chose soome fabric and cut out all the pattern pieces. The floral patterned fabric is from my parents' old sheets and the red clay-coloured fabric is from an op-shop. The horns are made out of gorgeous hand-dyed wool felt from winterwood toys, whereas the face & heart are straight acrylic felt.


Stay tuned for the finished product!

If you're thinking of sending in a toy, try and have it in by the 1st of December. They'll be on display for 10 days before being divvied up amongst the kids. Happy crafting!


Related post: Eugene wants a hug!

October 31, 2009

Crafting with... hair?


Crafting with hair? What am I talking about?

Here's a hint.... the hair stays on the head....


This is my 'canvas'... I'm talking about dreadlocks!

When I visited South America, a Peruvian Man in Buenos Aires dreaded my hair and showed me how to do it. The method is one that uses no wax, no chemicals, in fact nothing but a pair of hands, something to keep parcels of hair together & a crochet hook (size 2 i.e. 1.75mm works well, here I'm using a 1.25mm one).


I began last night, quite late, with two from the bottom section of his head. You work from the bottom upwards, which is handy if you decide to spread out the process over several days! You can just pull it back into a ponytail, and then you barely notice them.


Today I continued working on them. The dreads look quite funny at first - fluffy like a possum's tail! It's hard to explain exactly how to get it to that stage. Some people back comb the hair, I learned a slightly different technique which I hope to document soon. You basically split the hair parcel at two at the top and pull them away from each other. This forms a knot at the base. You then continue the same process, grabbing different bits of hair each time.


The crochet hook is then used to bring in all those fluffy bits and form a nice compact dreadlock. That's why I'm going ahead and calling it a craft!

You grab some of the fluff with one hand, then stick the crochet hook through the dread and pull some of it through. You then grab the bit you pulled through and bring it back to the other side again, and repeat the process. By only pulling through some of the fluff, and always different bits, you avoid just weaving one big strand through which could just come out again! We're basically just knotting the hair up so much that it can't come out again easily.

You maintain the dreads by a combination of rolling/twisting and occassional tidying up with the crochet hook. And washing, of course! People always brought that up when I had them... you can definitely wash them. I used a special shampoo which leaves no residues in the hair, but the Peruvian man said he just used any old soap or shampoo.


He only has seven dreads for now, but I thought it would be fun to share this work in progress with you straight away! On Halloween, no less!


Edit: I've uploaded some videos I took in Buenos Aires detailing some of the steps mentioned.

Step 1: How to start the dreads (base)


Step 2: How to continue the dreads (bulk)


Step 3: How to finish the dreads (crochet)


Related post: The dreadlocks are finished

October 11, 2009

Cathy Cullis: September

My lucky streak continues, with September arriving in my mailbox...


Cathy Cullis recently hosted an autumn giveaway, and September was the prize. The fabric was dyed with violas! If you're interested, she has a whole post dedicated to dyeing with blackberries and onion skins. Fascinating stuff.

If you haven't seen Cathy's work before, I recommend you head on over to take a look. I love the small stitches & details.... the floating faces & string hiding everywhere enchant me!


This piece, 'a memoir', was one of the first pieces of her work I saw. I've since discovered that she also makes dolls:


And writes poetry which sometimes finds its way into her textile art:


To see more of Cathy's enchanting work, also check out her flickr, etsy, and big cartel.

Next week begins Cathy's week of painting... I'm looking forward to it!

October 9, 2009

Shiny Happy Art

A lovely package came in the mail recently from Anna Bartlett...


I joined Shiny Happy Art's mailing list and won Septembers' giveaway: a lovely linen tea-towel.

I love the package's small details, like the illustrated envelope (cute!) and the extra gifts (a bookmark, set of art tags, and bookplates).

I also follow Anna Bartlett's blog "Shiny Happy Thoughts" which is a great mix of everything from emergency cookies to developing new products and her artwork including murals and step-by-step paintings.


October's giveaway is a purse-sized pink notebook. Go ahead and join Shiny Happy Art's mailing list to be in the running!

October 5, 2009

Modified buttercup bag


I've had Rae's Free Buttercup Bag sewing pattern in my crafty bookmarks folder since it came out in February. A friend's birthday was the perfect excuse to give the pattern a go. I had a 18"x20" piece of Peter Alexander's Bird Seed fabric in my stash. A little too small to do anything with - or so I thought!

I was determined to complete the bag with materials I had on hand, which didn't include a magnetic clasp. I modified the pattern a little bit to add a zip, as I have recently acquired an enormous quantity of them & I'm trying to use them in as many projects as possible. It also meant I could line the bag with yellow polkadot material while a classy "white" look when the zip is shut.

It was satisfying to put the sum of knowledge I've been acquiring through recent projects to use.

To install the zipper, I used techniques I learned in cindylou's How to make a lined zipper pouch tutorial. I made the handle using bunny bum's technique she uses in her market tote tutorial. I inserted the handle between the outside & the lining using the method I learned from cindylou's tutorial for a simple reversible totebag.

I skipped the decorative buttons, as I decided that this fabric didn't need it. I also added a little zipper pull because the zip is a fair bit down & the top of the bag curves.


It worked pretty well, although the zipper was still a bit crooked. Next time I'll sew down the seamline a bit, between the handle & the zipper to anchor the lining to the outside fabric to stop them separating when the zip is pulled open/shut.

It's a small bag, but perfect for a small wallet, phone & keys if you're going out. And a great use for pretty fat quarters!

I plan to make one for myself sometime, and will try and document my modifications so I can make a mini tutorial. In case you're interested, Sarah has already put together an alternate way to sew recessed zippers.

Curious Little Oyster pout balm


Annaliese, from the Curious Little Oyster, is giving away five of her Nilla Nilla pout balms. She doesn't appear to have drawn the winners yet, so if you're quick, you might be in for a chance! Become a fan of her facebook page and leave a message to be in the running.

I was lucky enough to win some Arancia pout balm in her last giveaway, and it is great - tasty, and very cute.


These lip balms would make a great gift. If you miss out on the giveaway, check out the range at her online shop. She has a bunch of things in stock from Melbourne craftsters, and says:
I handpick each item that sells in my lil shoppe. The criteria is that they are all eco in some way: organically made; sustainable; recycled or upcycled. But being green is not enough! Our goodies are GORGEOUS, fun and sometimes a little bit quirky!
She's also founded an Indie collective:
The Indie Collective is a meeting place for artisans, crafters, cooks and more for the purpose of creating greater buying power for what they need to make!

Being an Indie means that we often pay more for materials and ingredients... paradoxically, we are often the ones needing a better deal, so here is your place to make it happen!
Talking about giveaways, Geta's quilt arrived in the mail, and is prettying up my place! It has a gorgeous shine to it that the photos just don't capture...

Happy October, everyone, this year is zooming by!


Related post: Geta's Shadow Trapunto Quilt

October 1, 2009

English paper piecing with the Brown Owls


Last Sunday I attended Canberra's September Brown Owls get together. The theme was open, so I brought along the English paper piecing kit from a previous meet-up. Even though I missed that get together, I saw what the others got up to and wanted to give it a go myself.

You can make the templates yourself, or buy them. If you're in Australia, Lizard of Oz specialises in English Paper piecing and appliqué.

If you're interested in giving it a go, or simply want an explanation about what it's about, Sunshine has a pretty comprehensive post on it. She also has an alternative design you can use.

The method I was kindly taught by a fellow Brown Owl was mildly different: when basting the fabric to the cardboard shape, we pinned down two opposing edges of the hexagon, then creased all the other sides of the fabric over the edge. When it came to the threading, we stuck a needle through a corner of the hexagon near one of the pins, then put it through the middle of the side, and up again through the next corner and do on and so forth until we got all the way around.

In the photo above, I'd already cut the basting stitches and removed the cardboard template from the central hexagon, to be able to reuse it. I used some leftover scraps from a reversible tote I recently made.

September 27, 2009

Rotary cutter madness


I splurged on the weekend and bought the equipment necessary to do some serious rotary cutting. I had read the Purl Bee's rotary cutting tutorial after hearing about it on the Morsbags forum.

I've been lusting after a set for a while, since a lot of my cutting involves straight lines through a few layers of fabric. Following the tutorial's recommendations, I ended up getting a 36"x24" cutting mat, a smaller portable 12"x9" mat, a 12.5" square ruler, a 24"x6.5" ruler" and an Olfa 45mm ergonomic rotary cutter. I bought them from all Ozquilts. Shipping was fast & free (it is for orders over AU$150... I did say "splurge"!)


Well, I've been having fun getting used to the new equipment. Such a guilty luxury! I've been transforming my scraps into neat little 2" squares... maybe I'll make one of Ayumills' cute fabric baskets one of these days...

September 23, 2009

New padded shoulder strap for the tea towel tote

I recently made a tote bag from a tea towel, but I wasn't satisfied with the shoulder strap. Last night I carefully unpicked the top of the bag and removed the strap.

I decided I wanted a shorter handle that was double the width and had a little padding. I have some Sew Easy 100% bamboo batting (140gsm) for just such purposes.

The three most common ways to make handles seem to be
  1. Fold long strip in half lengthways & hem down the side. Turn inside out, iron so that the seam is on one side & topstitch down both edges. This is the method bunny bum uses for her market tote.
  2. Fold long strip in half lengthways & iron. Open up and fold raw edges of both sides towards the center fold line. Fold the sides together along the original fold line and iron. Topstitch down both edges. This is the method cindylouh uses for her simple reversible tote.
  3. The Morsbag method which is detailed in the downloadable PDF instructions. It ends up with a seam down the middle of one side.
I decided to go with option #3 because it seemed to be the easiest to accomplish with batting sandwiched inside it.

I did a little math, and decided I needed a 40"x12cm wide piece of green fabric (blue pen) and a 40"x5cm wide strip of batting (red pen):


Notice my mix of metric and imperial measurements? Heh...

It easy easy to adjust the diagram for a different-sized shoulder strap. The formula is:
  • Work out the width of the final strap (here 5cm).
  • The fold on the right in the diagram will be half that width plus 1cm (here 2.5cm+1cm=3.5cm).
  • The fold on the left will be the same width, only you will iron 1cm under.
I ironed in the creases, then unfolded it, placed the batting inside and ironed it closed again:


I ran three sets of stitches the length of the handles for strength & looks (for the latter I need to improve my "ironing and sewing in a straight line" skills!):

(I swear I'm not endorsed by Sunbeam!
Just my trusty ironing board cover...)


I carefully placed the new strap in the bag and sewed it all up. The resulting shoulder strap is just right length. It sits near my hip and can go over one shoulder or diagonally across the chest & it doesn't cut into my shoulder like the last one did.

I've put the bag in my "presents pile" - it'd make a nice gift for someone overseas (I feel a bit silly having Aussie merchandise).

Also, the old strap won't go to waste: I cut it in half and soon it will be the set of handles for another Morsbag. I have already chosen a new teatowel (from my beloved local op-shop). It's designed by the same person who designed the tea towel I used for this tote!

It has joined my "to do" pile, which is growing ever so sneakily...


Related posts: From tea towel to tote!, Morsbags & Morsbags from tea towels
Related Posts Plugin for WordPress, Blogger...